Amy's Crusty Italian Loaf
Von Claudia am Aug 17, 2005 | In Brot & Brötchen, Fool for photos

Ihr Kochbuch ist vergriffen, erzielt Höchstpreise bei ebay. Gebraucht bei amazon ist es für 157,46 Euro zu haben. Die Rede ist von Amy Scherber, die in New York eine Bäckerei betreibt und die angesagtesten Restaurants der Metropole beliefert. Einige Rezepte verrät Frau Scherber allerdings auch im Internet. So fand ich ihr Rezept für ein italienisches Brot mit herrlicher Kruste bei foodnetwork.com.
Das Brot ist einfach in der Herstellung, allerdings benötigt man wie bei den meisten guten Broten eine lange Fermentationszeit und somit eine sorgfältige Planung. Wenn ich daran denke, kommt mir immer Stan Nadolnys Roman "Die Entdeckung der Langsamkeit" in den Sinn. Einige wenige Ingredenzien, langes Kneten per Hand und die n?tige Ruhe - das sind die Zutaten aus denen gutes Brot gemacht wird.
Amy Scherber verwendet bei den meisten Rezepten "Kosher Salt". Das ist an sich noch nicht kosher im jüdischen Sinn, sondern wird dazu verwendet, Fleisch kosher zu machen. Es ist grobkörnig und somit sehr saugfähig. Verwendet man "normales" Salz, sollte man das berücksichtigen und entsprechend weniger nehmen. Ich finde es außerdem leichter zu verarbeiten.
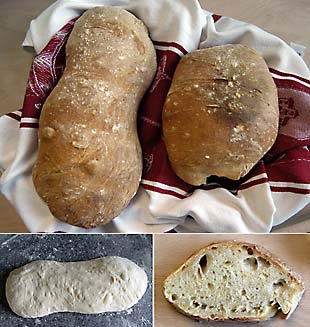
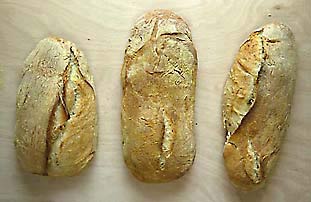
Das Brot hat einen ausgezeichneten Geschmack, die Kruste in Verbindung mit dem soften Inneren trägt zum perfekten "mouth feeling" bei. Beide Fotos sind übrigens aus dem gleichen Teig, das dunklere Brot ist an Tag 1 gebacken, die anderen drei am Tag darauf. Wenn man den Teig noch einen Tag stehen lassen will, sollte er unbedingt in den Kühlschrank.
Mehr iatalienische Brot-Rezepte:
Ciabatta
Oliven-Focaccia
No-Knead-Bread - das Brot für Knetfaule
Focaccia mit Sardellen
Pane Pugliese
Hier das Rezept (allerdings in englischer Sprache):

========== REZKONV-Rezept - RezkonvSuite v0.98
Titel: Amy's Crusty Italian Loaf
Kategorien: Brot, Brötchen
Menge: 3 Portionen
============================== VORTEIG ==============================
1 1/2 Tassen (12 ounces = 340g) very warm water (105 degrees
-- F to
-- 115 degrees
F)
1/4 Teel. Active dry yeast
3 1/2 Tassen (16 ounces = 450g) unbleached all-purpose flour
============================= HAUPTTEIG =============================
3/4 Teel. Active dry yeast
1/4 Tasse (2 ounces = 56g) very warm water (105 degrees to
-- 115
-- degrees F)
1 Tasse (8 ounces =226g) cool water (75 degrees F)
1 1/2 Tassen (12 ounces = 340g) Sponge Starter, recipe follows
3 1/2 Tassen (16 ounces = 450g) unbleached all-purpose flour
1 Essl. Plus 1 teaspoon kosher salt
============================== QUELLE ==============================
Erfasst 09.07.2005 von Claudia Schmidt
www.foodnetwork.com, Rezept von Amy
Scherber, N.Y. (Amy's Bread)
KOMMENTAR VON CLAUDIA:
Das ist ein sehr aufwändiges Rezept, zeitaufwändig, weil man planen muss. Setzt man den Sponge Starter morgens an, will dann ca. 6 Stunden später backen, ist man zu spät dran, denn der fertige, aufgegangene Brotteig muss nach ca. 1,5 Stunden Zubereitung mit Gehen noch mal für rund 8 Stunden in den Kühlschrank, um Geschmack zu entwickeln. Also gern auch über Nacht. Also: Den Vorteig am besten abends bereiten, den Rest dann morgens, dann kann man abends backen. Der Sponge Starter reicht für zweimal Brotteig. Entweder also zweimal Brotteig herstellen (oder für eine Party gleich die doppelte Menge) oder gleich nur die Hälfte an Teig nehmen.
Der Sponge-Starter ist recht üppig bemessen, so dass eigentlich auch die Hälfte der Menge reicht. Ich friere die andere Hälfte als neuen Starter ein und spare mir so einen Schritt.
Kosher Salt: Grobes Salz, bei "normalem" Salz also etwas weniger
nehmen!
Sponge Starter:
Mix all the ingredients together in a medium bowl and stir vigorously with a wooden spoon for 2 to 3 minutes until a smooth, somewhat elastic batter has formed. The batter will be very stiff; it gets softer and more elastic after it has proofed. You may find it easier to mix the sponge using an electric mixer, with a paddle or a dough hook, on medium speed for 1 to 2 minutes. Scrape the sponge into a 2-quart clear plastic container and cover with plastic wrap. At this point you have two options:
If you plan to make your dough later that same day, let the sponge rest at room temperature until it has risen to the point where it just begins to collapse. This may take 6 to 8 hours, depending on the temperature of the room and the strength of the yeast. The sponge will triple in volume and small dents will begin to appear in the top as it reaches its peak and then begins to deflate. The sponge is now in perfect condition to be used in a dough. It's best if you have already weighted or measured out all of your other recipe ingredients before the sponge reaches this point so you can use it before it collapses too much.
If you're not planning to make your dough until the next day or the day after, put the covered sponge in the refrigerator and let it rise there for at least 14 hours before taking it out to use in a recipe. Be sure to compensate for the cold temperature of the starter by using warm water (85 degrees to 90 degrees F) in the dough instead of the cool water specified in the bread recipe. Or let the starter sit out, covered until it reaches room temperature (this may take several hours), but don't let it collapse too much before you use it.
Hauptteig:
Combine the warm water and yeast in a large bowl and stir with a fork to dissolve the yeast. Let stand for 3 minutes. Add the cool water and sponge to the yeast mixture and mix with your fingers for about 2 minutes, breaking up the sponge. The mixture should look milky and slightly foamy.
Add the flour and salt and mix with your fingers to incorporate the flour, scraping the sides of the bowl and folding the ingredients together until the dough gathers into a mass. It should be wet and sticky with long strands of dough hanging from your fingers. If necessary, add 1 tablespoon of water.
Move the dough to a lightly floured surface and knead for about 5 minutes, until it becomes supple and fairly smooth. This is a sticky, wet dough; don't be tempted to add a lot of flour to the work surface. Just dust lightly and use a dough scraper as necessary to loosen the dough from the table during kneading. Allow the dough to rest for 15 minutes, covered with oiled plastic wrap. (This rest period is the autolyse.)
Knead the dough for 3 to 5 minutes, until it is stretchy and smooth yet still slightly sticky. Shape the dough into a loose ball, place it in a lightly oiled bowl, and turn the dough in the bowl to coat with the oil. Cover the bowl tightly with oiled plastic wrap let the dough rise at room temperature (75 degrees to 77 degrees F) for about 1 hour, or until the dough looks slightly puffy but has not doubled.
Place the dough in the refrigerator for at least 8 hours, or preferably, overnight to let it relax, develop flavor, and become more manageable. Take the dough from the refrigerator and let it sit at room temperature for 1 to 2 hours, until it warms up and starts to rise. Flour a work surface well and gently dump the dough onto it. Divide the dough into 3 equal pieces (about 13 ounces each). Gently flatten one piece, pressing out some of the air bubbles, and stretch into a rectangle. Form the dough into a log and then into a short baguette about 12 inches long. The loaf will be loose and slightly irregular in shape. Cover an area at one side of the work surface with a thick layer of flour and place the loaf seam side down on the flour. Repeat with remaining pieces of dough, leaving plenty of space between the loaves. They will spread as they rise. Cover the loaves with well-oiled plastic wrap and let them rise for about 1
hour.
Thirty minutes before baking, preheat the oven to 475 degrees F (= 250?C). Place a baking stone in the oven to preheat and position an oven rack just below the stone.
Sprinkle a peel very generously with cornmeal. Line an upside-down baking sheet with parchment and sprinkle very generously with cornmeal. Lift one loaf and flip it over onto the peel so the floured side is on top. Gently tug on the ends to stretch the loaf to the full length of the peel (about 14 inches). Repeat with the remaining loaves, placing another one on the peel and last one on the pan. Dimple each loaf with your finger in about 6 places, but don't deflate them too much. Be sure the loaves are loosened from the peel, then carefully slide them onto the baking stone. Place the pan of bread on the rack below the stone. Using a plant sprayer,
quickly mist the loaves 8 to 10 times, then quickly shut the oven door. Mist the loaves again after 1 minute. Then mist again 1 minute later. Bake for about 10 minutes, then reduce the temperature to 450 degrees F (=230?C) and bake for 15 minutes longer, or until the loaves sound slightly hollow when tapped on the bottom and the crust is a medium to dark brown. (If the crust is not brown enough, the loaves will soften as they cool.) Transfer the bread to a rack to cool for at least 30 minutes before serving
Yield: 28 ounces
=====
Noch kein Feedback
| « Globalisierte Küche - ein messbares Problem | Caesar's Salad » |


